It’s the ultimate aspiration of many golfers to own a life-size golf simulator for their personal use — one that allows them to play their favourite golf courses or practice on the range day or night, rain or shine, any time of the year.
You might think about the tracking system, the hitting mat, and the projector, but what about the enclosure?
A quality enclosure is crucial for a great golf simulator experience. The main things are that it should be made of high-quality materials, block out ambient lighting for a clearer picture, and be able to catch and contain any errant shots.
Without a good enclosure, you won’t be able to realize the full potential of your golf simulator.
In this article, we’ll review and compare our picks for the best golf simulator enclosures across a range of different budgets. We’ll also provide a buying guide that will help you narrow down the enclosure that will suit you best.
Note: Golfstead has tested and/or conducted in-depth research into all of the products featured in this guide. Our editorial process for these rankings takes into account a mix of many factors which may include performance, reliability, usability, value for money, cost, and the general consensus from other users of the product. The list that follows may be reassessed or updated over time.
Our Top Picks For Golf Simulator Enclosures
The following are our top selections based on our own testing, research, and experience:
- SIG10 Golf Simulator Enclosure
- Carl’s Place DIY Golf Simulator Enclosure
- PlayBetter SimStudio Enclosure
- PerfectBay Golf Simulator Enclosure
- SwingBay Golf Simulator Enclosure
- SIGPRO Commercial Enclosure
- HomeCourse ProScreen 180 Enclosure
Note: Prices for the items listed on this page are subject to change. To see the current price, please click on the relevant links below.
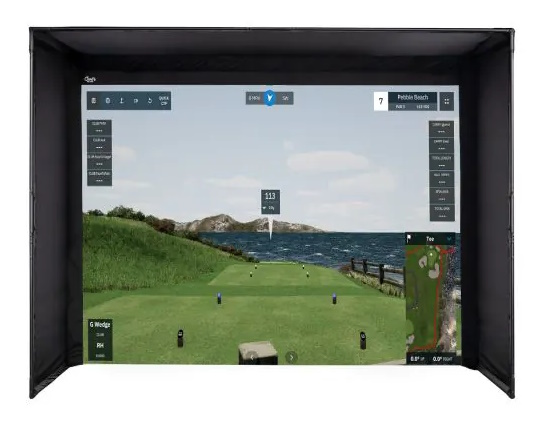
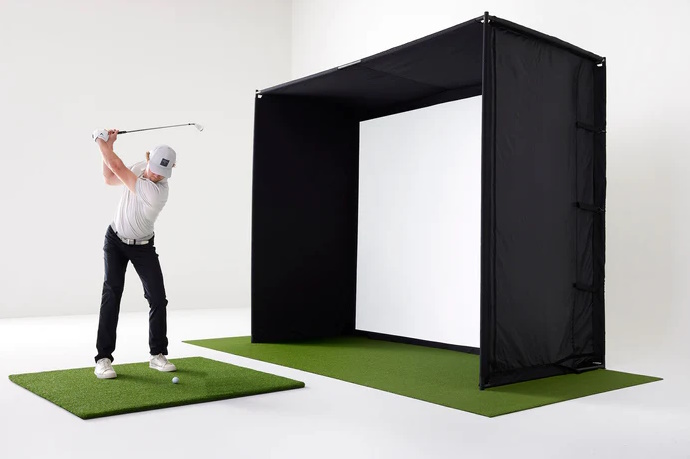
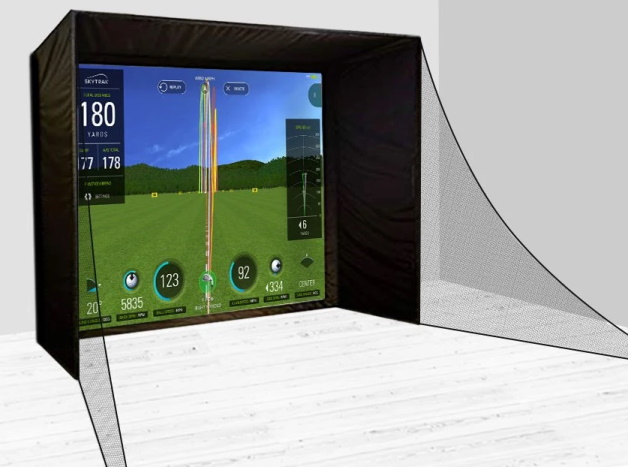
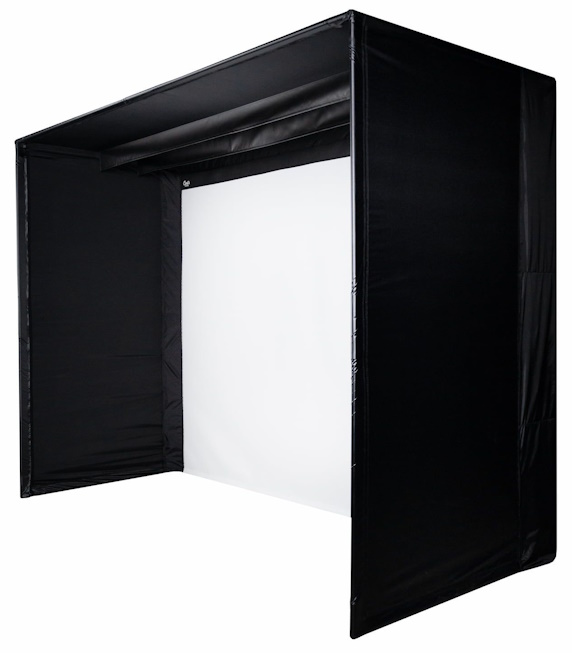
1. SIG10 Golf Simulator Enclosure
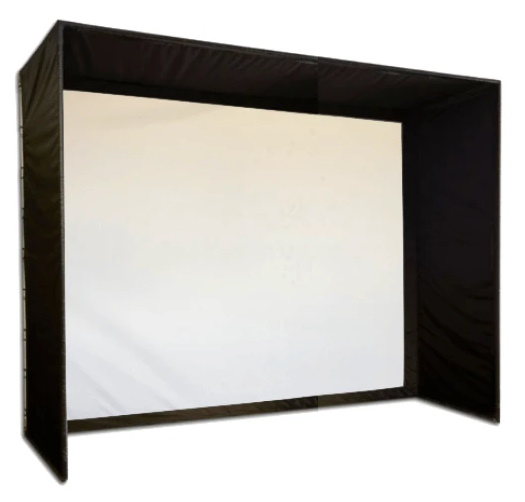
The SIG10 is an studio that was created by The Indoor Golf Shop, one of our top recommended sources for golf simulator equipment.
It has everything going for it: a thick, durable enclosure, a large, high-impact screen, side barrier netting, and weights to keep the installation secure.
The SIG10 was designed so that the projection image fills 100% of the screen. It is nearly 11′ wide, sitting between the SIG8 and SIG12 in terms of size.
Everyone we know who has used a SIG screen & enclosure has been very happy with it; this is on top of the great results we’ve had with it ourselves. The nice thing about the SIG10 is that it can fit in most spaces, including in rooms with a standard ceiling height of around 9 feet.
Features
The SIG10 enclosure is 10’10” wide, and the screen is 10’1″ wide x 7’7″ high. It’s very large in person.
The screen, made of tight-knit polyester, is designed for a 4:3 aspect ratio projection and can withstand ball speeds of up to 250 MPH. An optional Premier Gray variant increases contrast and improves the image quality in brighter rooms.
The SIG10 also features black nylon walls, a powder-coated steel frame, a bottom weight strip, and protective foam padding.
Assembly and installation can take an hour or less: just connect the frame via quick connectors and attach the screen to the frame with bungees.
Recommended space requirements for the SIG10 are 12 ft wide x 9 ft high by 18 ft deep, in addition to being able to swing your longest club comfortably.
If you have the budget for a premium simulator enclosure that will impress your friends, definitely give the SIG10 serious consideration. Customer support is terrific and will help you through the entire process from delivery to setup.
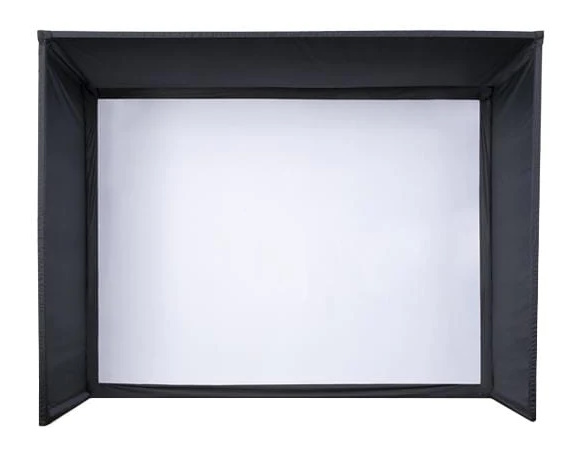
2. Carl’s Place DIY Golf Simulator Enclosure
Carl’s Place is a company that has been around since 2006. They offer some of the best and most popular enclosure systems on the market.
Their DIY enclosure has gone through several iterations. The latest version remains affordable, but now:
- has a screen with a borderless bottom that sits flush with the floor, creating a unique seamless look
- can accept an optional back cover to eliminate light bleed for the brightest, clearest image
- has even less bounceback and more flexibility in terms of fine-tuning the tension of the screen, thanks to a cabled bottom and releasable zip ties
This enclosure is highly customizable, giving you control over the screen material, size, and various optional accessories. They can even make a custom-size enclosure down to the inch if that’s what you want.
Depending on the options you choose when building a Carl’s Place enclosure, you could save a significant amount of money compared to enclosures from other brands.
Additional Info
Starting with the screen, Carl’s Place offers the following options:
- Standard: a loosely woven, heavy-duty polyester ideal for beginners.
- Preferred: heavy-duty polyester with a tightly woven knit, smoother surface for better image quality, and strong silicone reinforcement.
- Premium: a triple-layer, heavy-duty polyester with noise-dampening qualities, the smoothest surface, and the best image quality.
- High-Contrast Gray: same quality as Premium but with a gray screen material that improves contrast in brighter rooms, producing deeper blacks and richer colours.
Naturally, it gets more expensive as you move towards Premium.
Next, Carl’s Place allows you to choose between six enclosure sizes (not including custom requests): 7.7’x10′, 7.7’x13′, 8’x8′, 8’x10.5′, 8.5’x11.5′, and 9’x12′. For custom sizes, you can use Carl’s Build-Your-Own-Golf-Simulator Tool.
Then you can choose optional accessories which include (but are not limited to):
- pipe framing: all the correctly sized pipes necessary for the frame as well as any necessary fittings
- foam inserts: protect the frame from golf ball impacts
- side barrier netting to help catch shanks and mis-hits
- Carl’s Golf Simulator Turf that gives the studio a finished look and allows for putting
These DIY enclosures use 1″ EMT pipes for the frame, which are more affordable but should not be used to mount electronics. Carl’s Place offers a stronger, higher-quality Pro Enclosure that can support mounting here.
Nylon blackout walls, corner fittings, ball bungees and releasable zip ties are also included.
One of the things we like most about Carl’s Place is how willing and able they are to work with you to build the enclosure that’s perfect for you. Their enclosures are proven and have great reviews, and on top of that, the seamless aspect of this enclosure is something you’d be hard-pressed to find anywhere else.
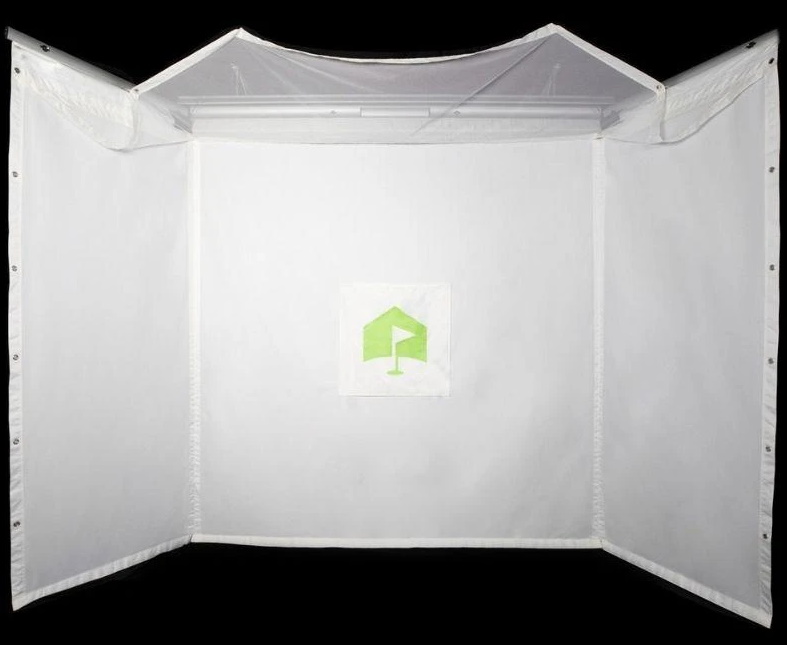
3. PlayBetter SimStudio Enclosure
This all-inclusive enclosure system is offered by reputable golf vendor PlayBetter. Touted are its ease of setup, affordability, and wide selection of sizes that don’t differ all that much in price.
With the SimStudio, you don’t just get an enclosure on its own. You also get a high-quality matching impact screen, projector, hitting mat, side netting, and landing pad, so once you hook up a launch monitor or tracking system, you’re ready to start your golf simulation.
This enclosure is out-of-the-box ready, and it shouldn’t require more than one person and a couple of hours to install.
Features
The PlayBetter SimStudio studio consists of:
- a SimStudio enclosure
- an HD golf simulator projector
- a 5’x5′ hitting mat
- landing pad turf
- side barrier netting
The enclosure features blackout side and upper walls. It’s available in the following sizes:
- SimStudio8: 8′ (W) X 7.5′ (H) X 4′ (D)
- SimStudio10: 10′ (W) X 8’6 (H) X 5’4 (D)
- SimStudio12: 12′ (W) X 8’6 (H) X 5’4 (D)
- SimStudio13 Deep: 13′ (W) X 10′ (H) X 10′ (D)
One thing to note is that this enclosure includes a mounting bracket which allows you to mount the projector directly to the enclosure frame, so no ceiling or floor mounting is needed!
The screen is made of quality materials and dampens the noise of ball impacts very well. Bounceback is minimal, but there’s still enough to where the ball should come most of the way back to you after your shot.
You can expect the projector included in the SimStudio to be minimum HD quality and put out enough lumens for a bright experience. One of the most recent options is the Optoma GT2000HDR.
These enclosures are affordable and large. The one downside is that you can’t get the enclosure, screen, and frame on their own without other components being included. But PlayBetter has awesome customer support and they’ll do their best to accommodate you.
4. PerfectBay Golf Simulator Enclosure
This enclosure is sold by Top Shelf Golf and has a similar look to the SIG10 enclosure reviewed above, with a screen that is nearly just as large.
The PerfectBay, made in the USA, has a quality design and is focused on indoor use. It’s an all-in-one solution that requires no tools to set up.
The impact screen is designed for 4:3 projection that fills 100% of the screen, and it’s able to withstand ball speeds up to an impressive 250 mph.
Additional Info
The PerfectBay impact screen has a very smooth surface, with a premium triple-layer construction made of tight-knit, heavy-duty, impact-resistant polyester. The center layer works to dampen the noise of golf ball impacts.
The enclosure provides a shading effect for the screen to bring out the brightest image possible given the ambient lighting. It’s five feet deep, and combined with included side nets, it can catch even the worst shanks.
Other features of the PerfectBay enclosure are:
- black nylon enclosure material
- no gaps around the screen for the ball to pass through
- weight bags, EMT pipes, steel corner fittings, and other assembly items
The size of the regular PerfectBay unit is 10’5″W x 8’H x 5’D with a screen diagonal of 144″.
There are also PerfectBay PLUS and PerfectBay WIDE enclosures:
- PLUS: 12’W x 9’H x 5’D footprint, 164″ screen diagonal, 4:3 aspect ratio
- WIDE: 13.5’W x 8’H x 5’D footprint, 177″ screen diagonal, 16:9 aspect ratio
Assembly is fairly straightforward; full instructions are provided here. Make sure there is a bit of clearance between the wall and enclosure, and keep your balls clean to avoid marking up the screen.
5. SwingBay Golf Simulator Enclosure
This enclosure was designed by the team at Rain or Shine Golf, and it takes into account the feedback of hundreds of golf simulator owners.
The SwingBay screen & enclosure system isn’t cheap, but it’s excellent. It ranks high on our list because it’s well-made, it looks great, it’s relatively easy to set up, and it’s used with some of the most successful simulator packages on the market.
It features a solid assembly framing system with a heavy-duty projector screen and walls, and it allows you to get one of the best simulator experiences possible.
Features
We start with the screen, which is 7’3″ tall and 9’8″ wide — slightly smaller than the SIG10 screen but also a little more affordable. It’s built to withstand balls going at up to 250 mph (good luck reaching that speed), and is optimized for a 4:3 image aspect ratio.
Next is the blackout side and upper walls. These are made of commercial-grade polyester, they protect the projector image from being washed out by external light, and they contain mis-hit shots that don’t hit the screen.
There is a bungee system for fastening the screen to the frame, and a 8′ x 10’5″ x 4’8″ deep framing system. A 9′ x 12′ enclosure size is also available in addition to the 8′ x 10.5′ size.
Despite the fact that the enclosure walls help block out some light, we still recommend a projector with 3000+ lumens for best results.
You won’t be left out in the cold with this: you can get professional help choosing the right accessories, full assembly instructions, and size specifications for all the components. For that, go to this page.
6. SIGPRO Commercial Enclosure

This particular enclosure is The Indoor Golf Shop’s heavy-duty offering designed for indoor golf facilities or beastly residential installs.
As a high-end upgrade to their original SIG enclosure, the SIGPRO Commercial is engineered for thicker, heavy-duty 2″ piping. The piping is offered as a separate add-on, or you can source and cut your own piping. Projectors and overhead launch monitors can be mounted directly to the frame using an enclosure mount kit.
The enclosure also has a new design that eliminates the need for a bottom front pipe, thus allowing the screen to sit closer to the floor. This makes for a more immersive projected image.
Included in the base purchase is the SIGPRO Premium Impact Screen, surround material, internal & external pipe padding, and canopy fittings. Numerous one-click upgrades and add-ons are available including a Premier Gray screen (for brighter rooms), baffles, landing pad turf, blackout screen, and more.
This enclosure enjoys a safe and durable design. One of its greatest strengths is the large variety of sizes it’s available in, with heights ranging from 8′ to 10’5″, widths from 10’5″ to 16’3″, and depths from 5′ to 15′. What’s more, if none of the size options do it for you, you can get the enclosure made custom to your exact specifications.
In our experience, the quality of the SIGPRO Commercial enclosure is outstanding. The Indoor Golf Shop offers a professional assembly and setup service too, if you’d like to go down that route.
7. HomeCourse ProScreen 180 Enclosure
This enclosure system by HomeCourse is an excellent option for golfers who want to practice their game indoors. You can put it in any garage, basement or living room as long as it has enough space to accommodate a full swing of your longest club.
The ProScreen 180, which can be fully retracted and extended with the press of a button, benefits from two main improvements over the old HomeCourse Pro Screen:
- the old side netting has been replaced by Pro Arms made of ballistic-grade screen material
- the Pro Arms can be used as enclosure side walls or extended to create a wide 14 ft projectable area
It can be used as a simple indoor driving range or as part of a golf simulator. It has enclosure netting and can be retracted at the press of a button.
Features
Pro Arms & Sky Net
These create a topped enclosure that helps contain the worst mishits — errant shots, shanks, sky balls, etc. — allowing you to practice with real balls.
Alternatively, the Pro Arms can be extended straight outwards to create an ultra-wide 16:9 projectable area that is 14 feet wide.
Ballistic-Grade Screen
Because the screen is made of ballistic-grade material, you can go all out with your driver at point-blank range and it’ll take it no problem.
The screen also flexes at the bottom so that the ball can roll back to your feet. Just make sure you can make a full swing unimpeded!
Retractable System
The Pro Screen is battery-powered and comes with a wireless remote. With it, you can press a button and have the screen fully retract in less than 30 seconds.
This means that you can easily set up and take down the screen for an afternoon session, and you don’t have to deal with a mess of cables.
Projectable
The HomeCourse Pro is projectable, which means it can be used with any projector and golf simulator. Check out our recent article on the best golf simulator projectors for ideas.
Add-Ons
If you have a high ceiling and would like to mount your Pro Screen on the wall, you can do that with the HomeCourse Wall Mount Kit.
In addition, you can pair the Pro Screen with a landing pad that will protect your flooring.
Space requirements are a minimum of 8.5 ft high x 10 ft wide x 8 ft deep. For more information about add-ons and more, visit this page.
Buying Guide
1. Size & Aspect Ratio

Size is obviously a crucial factor in golf simulator enclosures. You need to have a clear understanding of the space in which you plan to house the enclosure, and also, what aspect ratio you intend to project.
If you want a widescreen 16:9 experience for your simulator, you should get an enclosure that has more of a rectangular shape, as this will allow you to install an impact screen with that aspect ratio.
On the other hand, if you don’t mind a 4:3 experience, you should get an enclosure that has more of a square shape. Most golf simulator enclosures and screens are designed for 4:3 projection.
For the most part, the enclosure determines what the width and height of your simulator setup will be. Make sure to compare the minimum space requirements of enclosures you’re interested in to the size of your space.
Also check if the seller you’re buying from is able to provide custom enclosure sizes. In this case, you’d be able to get something that fits perfectly with your needs and situation.
2. Frame
The frame is what holds an enclosure together, so it should be made of a strong material like steel or aluminum. There are a few things to consider in this regard.
First, you don’t want your golf ball to ricochet off the solid frame as this can cause unintended injury or damage. Hence, check if there are protections available for the frame such as flaps or foam padding inserts.
Second, how strong is the frame? For example, 1.5-inch aluminum piping is going to be less strong than 2-inch steel piping.
This is normally not a big deal as long as the enclosure is sturdy and structurally sound, but if the piping has a larger diameter, you may be able to mount launch monitors and projectors directly onto it which is a big plus.
Third, check if the enclosure is a DIY kit or is ready to assemble. If it’s the former, it typically excludes the pipe framing which you’ll have to get yourself. This will save you money but requires more work.
3. Material & Protection
Good enclosures have “blackout” side and upper walls. These not only help block out the ambient lighting in the room so you get a brighter picture, but they also help catch your ball if you hit an errant shot and miss the screen or are hitting a high-lofted iron like a wedge.
These enclosure walls are typically made of nylon which is very durable and low-cost.
In addition to the above, side netting and additional top netting may be available to protect against wayward shots even more. Covers can be set up behind the screen to minimize light bleedthrough and improve the quality of the projected image.
One last thing we haven’t mentioned in the depth of the enclosure. Generally speaking, the deeper the enclosure, the better. This is because:
- it gives a more immersive simulator experience
- it blocks out more ambient lighting for an even clearer image
- it provides more protection for wayward shots
You should aim for an enclosure depth of at least five feet, but higher depths may be available depending on the source. A great budget alternative to a deeper enclosure is using blackout curtains or panels which are pretty widely available these days.
4. Budget

Of course, your budget is very important when shopping for a golf simulator enclosure. Not everyone can afford enclosures that cost $3000+, and fortunately, there are ways to keep the cost well under this amount.
The biggest determinants of price when it comes to enclosures are the size and type of framing, as this leads to more pipe, screen material and blackout wall material being necessary which naturally increases the cost.
In this guide, we’ve tried to include quality enclosures with many different size options over a range of budgets that golfers might have. But the great thing is that you don’t have to drop the full cost of it at once.
Our recommended golf simulator source here provides easy financing options that allow you to pay for your enclosure over the course of a year or longer. Don’t forget about this option.
Conclusion
Golf simulators have become a lot more accessible and affordable over the past decade or so, and this means more golfers and businesses than ever before have been able to have their own setup.
A good enclosure that is made of quality materials, blocks out light, offers good protection against wayward shots, and provides an immersive experience can make a world of difference.
Finding an enclosure that will meet your needs is certainly possible with some research.
Each of the enclosure options reviewed above offer excellent value for the cost. We’ve given you the information you need to make a decision; now it’s up to you to go the rest of the way.
If you would like some help building out a full golf simulator that includes a launch monitor, projector, impact screen and mats, you can start by checking out this article.
Thanks for reading this guide. What kind of enclosure are you considering for your golf simulator? Feel free to share your thoughts in the comments below.
The post 7 Best Golf Simulator Enclosures – 2026 Reviews & Buying Guide appeared first on Golfstead.
Learn More About Golf
If you want to learn more about golf, check out these other helpful resources!